 By Hans Walltin, Walltin Building Control.
The Problem
When planning climate control, i.e. heating and cooling, for different rooms, such as kitchens, living rooms, bedrooms and bathrooms, one problem that could easily occur is an unevenness in temperature between rooms with different functions and characteristics. For example, the kitchen may have very warm cooking areas, whilst the living room may have large glass windows and doors to let the sun in.
Consequently, a number of questions arise:
Is it important to consider the placement of thermostats/sensors?
Is there anything special you need to keep in mind given the numerous settings in a modern KNX thermostat?
With KNX, it is easy to integrate different sensors and heating/cooling systems for good functionality, so here are some tips on how to avoid some common problems and how to take advantage of the different characteristics of the KNX system.
The Solution
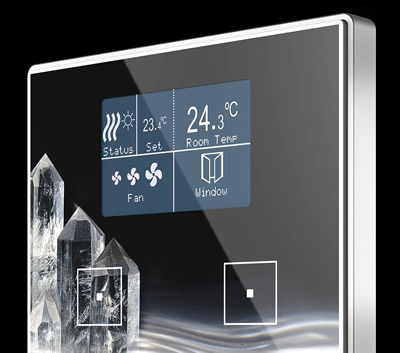
Start by finding out what type of heating and cooling systems are to be installed. A major advantage of KNX thermostats is that they can handle both heating and cooling, with automatic changeover between the different sequences. This can be set in the ETS thermostat parameters.
Setting Temperature Control
If you are unsure of how to set the temperature control, good help can be found in the parameter settings. This will give you basic settings for different control modes and different types of heating and cooling systems. Use these recommendations and you will get the climate regulation going fairly quickly, which you will be able to fine-tune later in the project.
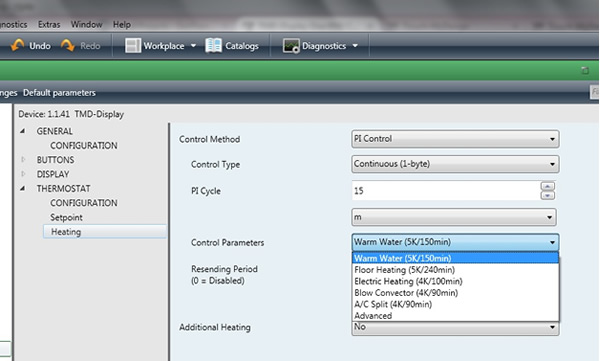
You can choose to use PI controller/2-point control as well as various heating systems such as underfloor heating, radiators, fan convectors, etc. In most cases, PI (Proportional Integral) control is used as it offers steady and comfortable adjustment as well as economical operation.
Positioning Thermostats
It is important to place the thermostat in a good position. For example, do not mount it above a radiator, next to an oven or a fireplace, or where the sun will shine on it. If you do, you are likely to have problems with the heating system as its effect will be reduced and the cooling system may even be activated unnecessarily.
Choose a location where the temperature measurement is not affected too much by rapid changes in temperature, preferably at a height of approximately 1 to1.5 metres above the floor.
Types of Control
It is recommended to use heating/cooling actuators that can handle 1-byte control signals, and then the reactor to PWM (Pulse-Width Modulation) control the heating and cooling valve, instead of the thermostat. This also gives a better overview and more accurate diagnosis when you look at the traffic on the bus via the ETS Group monitor or Bus monitor. If you have no actuator for 1-byte handling, select 1-bit instead and let the thermostat handle the PWM control.
For the thermostat to work well, whatever control method, one should calibrate the thermostat’s measured value with the current room temperature, and set the calibration value in the thermostat’s ETS parameters. Be sure to use a measuring instrument which is calibrated by an accredited testing company.
Temperature Modes
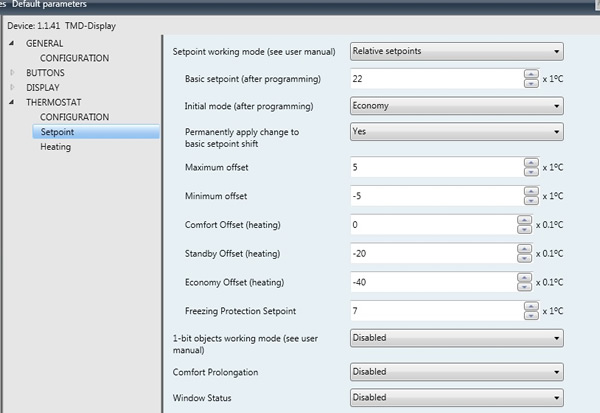
If you want to switch between different setpoints in different rooms in a simple way, depending on the time of day, occupancy etc, it is easy to use the parameter settings’ fixed temperatures for Comfort, Standby and Economy/Night. For example, the Comfort setpoint could be for 21 degrees, the Standby for 19 degrees and the Economy for 17 degrees.
The Comfort Mode is intended for normal use, when there are people in the room. The temperature should be comfortable for the specific user, which of course varies between different individuals.
The Standby Mode is a slightly lower temperature, typically by 2-3 degrees, to save energy, but not too low – the temperature must be able to reach the Comfort temperature fairly quickly if and when someone enters the room again, thanks to automatic changeover using a presence detector.
The Economy Mode is the long-term use of an even more economical temperature, typically 3-4 degrees lower than the Comfort Mode. This is normally used during night time and longer absences, such as weekends. For even longer absences, such as holidays, you can lower the temperature by another 1-2 degrees using the 2-byte setpoint group object in the thermostat, triggered by an ‘Away’ scenario.
Finally, the Frost Protection Mode is the function used when a window is open to ventilate the room for example. The heating is now locally switched off to save energy. The temperature must not fall too much however, as there may be a risk of water pipes freezing etc, so this mode guarantees a lowest temperature, normally 7-8 degrees, by activating the heater again. When the window is closed, the Comfort Mode will be activated.
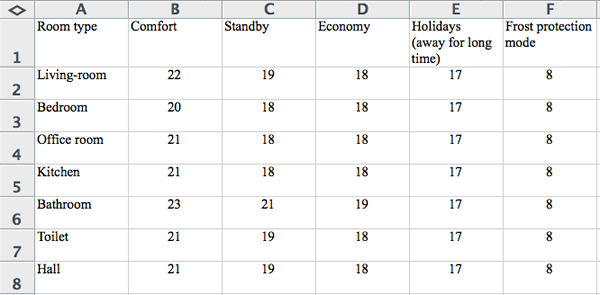
The changeover between the various modes (except the Holiday/Away temperature) is usually done by 1-bit values from a presence detector or push button for example, while the changeover to Economy is usually made with a time channel before the evening/night.
System Inertia
Before using different setpoints during the day, be aware of the climate system’s inertia. A floor heating system for example, will not lower the temperature quickly, probably not before it is time to increase the temperature for the next time cycle. So if using underfloor heating, do not change the set value too often – in fact just lower the temperature if you go on vacation for a week or two.
With radiators or convectors, an increase/decrease in temperature is faster, which is far more suited to more frequent setpoint changes.
Heat Pumps
A heat pump is likely to shut down during summer time, and lower the supply temperature to the floor coils or radiators, depending on the outside temperature. This means that even if you increase the thermostat’s set values, the temperature will not increase in the rooms, even though the heating valves are fully open, because there is no hot water to heat the rooms. In this case, if you absolutely want underfloor heating during summer, for example in the bathroom, it is recommended that you also install electric floor heating, which can heat up and dry a wet floor even if the heat pump is not supplying any heat.
In order to save energy and ensure that the electric floor heating is only active during summer, the KNX climate installation can be activated/deactivated for summer and winter via a combination of outdoor temperatures and summer/winter timer.
Cooling
During the summer when there is a need for cooling, a cool water system may be in operation, with control valves (like heating, but inverse) in order to decrease the room temperature, or by air-conditioning units, controlled by IR-links or gateways. The KNX thermostat will automatically switch to a cooling sequence instead of heating – there is no need for extra settings or manual handling to take care of this!
Do not forget that cooling is much more expensive than heating, so make sure that the cooling supply system is not running automatically if, for example, you are not home, or if a door/window is open. Use binary inputs on the doors/windows and a burglar alarm or manual switch to turn on the ‘Away’ mode in order to avoid the risk of the cooling running and incurring unnecessary cost.
Conclusion
A well-designed climate control system leads to fewer problems during commissioning, and lower costs for programming and daily operation. And if you invest a little more money in good climate equipment, the potential for more economical operation increases drastically. In order to achieve comfortable and energy-efficient climate control easily, be sure to get as much information as possible about the type of heating and cooling systems to be installed, how the house will be used, and any other useful information.
Simply by examining the various KNX device application programs in the ETS, you can get an idea of how different climate components work, and avoid most surprises. Look through the floor plans of the building, take note of the building’s orientation with regard to the sun, and plan the best places to mount thermostats. With these simple tips, you will discover that KNX is a really good solution for climate control!
Hans Walltin is a KNX Tutor, board member of KNX Sweden and the manager of Walltin Building Control AB, a systems integrator and KNX distributor in Sweden.


