 By Christophe Lavergne, DMC USA.
When we train people in KNX technology, we often see bad habits that they have developed when programming. Whether a newbie or an old hand, their projects in ETS software fail to have a correct structure and/or documentation.
Some of the most common problems we see in ETS projects are as follows:
• not well-documented.
• building structure non-existent.
• no description for group addresses or group objects.
• no backup.
• no files associated with projects, etc.
Why Does it Matter?
One simple fact to keep in mind is that the better your project is documented, the more easily you can come back and modify it in future. Ask yourself this: were you to come back to your client’s installation a few months or years later, are you sure that you would be able to find everything you need in your ETS project, easily? Probably not. As a result, you will needlessly lose time, and money.
In this article, I will outline some basic principles of building a KNX project in ETS that I hope will be helpful for everybody who programs KNX installations, even those who have a lot of experience with the software.
Good Habits
In order to ensure that your project can be reviewed in future, few good practices are recommended:
1) Number all circuits and push buttons on your blueprints. Create a naming convention that you will use for all your projects, and standardise as much as you can. This will save you time not only in building new projects but when reviewing, debugging and searching for issues in old ones.
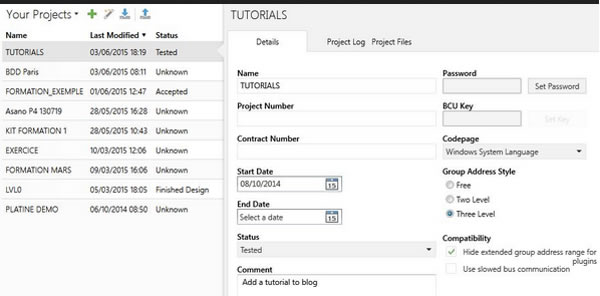
2) In the ETS home page, click on the project that you want to edit. On the right of the screen is where all of the information about the project should be found. Do the following:
• Fill in all fields.
• In the ‘Details’ tab, enter everything about the project that you may need to remember in future.
• In the ‘Project Log’ tab, you can add different information such as any modifications you have made since you last opened the project, and anything you intend to do but have not yet done.
• In the ‘Project Files’ tab, add all of the files involved with this project, for example dwg blueprint files, technical documentation about KNX devices, IP addresses structure, etc.
3) In the project itself, several steps should be followed in order to ensure proper and complete documentation.
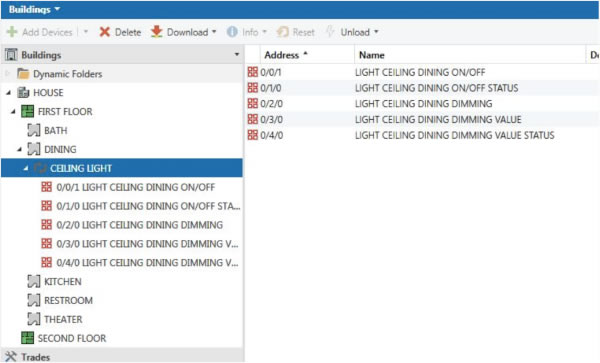
• Begin with the building structure. Once the structure is established, you can add the different devices of your project in every room. This will allow you to locate easily the devices in every room in your building.
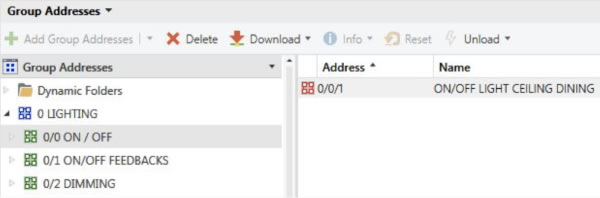
• Group addresses – as with circuit numbering, the most efficient thing to do is create a group address structure that you intend to use for all of your projects. Once the structure is created, export it in .xls format, and you will be able to re-import it in every project. This will allow you to know, for example, in all of the projects that you manage, that group addresses beginning with 1/0 correspond with all up/down commands for blinds. In the bus monitor, you can see quickly group addresses and associated functions.
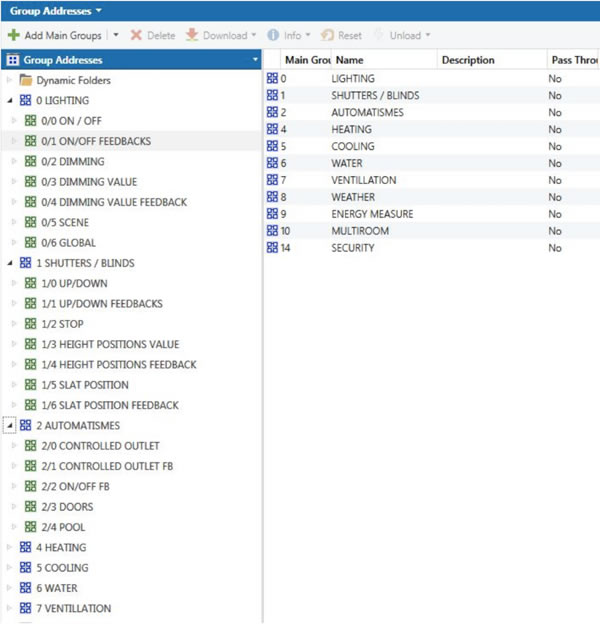
• Name your group addresses precisely, so that they match your circuit numbers.
• Group objects. Your group objects must be given a description that matches the function (as well as the group address) associated to each group object. A useful way to do this is to name the group object with the same name as the main group address with which it is associated.

• Don’t forget that you can also add ‘Functions’ for every room, in the building structure. These functions can receive group addresses, making your projects easier to read and understand. Do not hesitate to use them.
4) Finally, it may seem obvious, but do not forget to backup your project! You would be surprised how many systems integrators forget this step. Use the ‘Export’ function in ETS to save your project as a .knxproj file on a NAS, to the cloud, or any secure place that you will be able to access should something go wrong with your computer.
Conclusion
Programming your projects properly may take a little more time initially, but it will save you a lot more when it comes to debugging a program, modifying it, or transferring it to a partner. In addition, if you can provide a complete report to your customers that is well-documented and organised, it will help demonstrate your professionalism and set you apart from your competitors.
A video of this tutorial can be found here.
Christophe Lavergne is the Webmaster, Community Manager and KNX Trainer for DMC USA. DMC’s main focus is to provide smart energy-saving solutions based on international standards in new and renovated buildings and homes. DMC also offers the first certified KNX training centre in the USA.